Monday, June 4, 2012

Side-Snapping Soaker Pattern

So, you've been waiting over a year for a pattern for the side-snapping soaker.  Well, here is a testing pattern.  I have not gotten a chance to sew one from it yet, and so I do not have a picture tutorial yet.  I will hopefully get that done this week.


The one shown is the one I made last year and was done with PUL and fleece.  For that kind, I suggest sizing up on the body of the soaker but keeping the waistband and leg cuffs the size you actually need.

**Directions:

Cut out the soaker pattern you need.

Fold the edges (formerly the side seams) in one inch in the front, and 7/8" in the back.  The wrong sides should be together when you do this so that you have a neat looking front.  Stitch these down.

Fold the short edges of you waistband pieces in 1/2" with wrong sides together.  Stitch these down.  Then fold the long sides together (wrong sides together) and stitch the raw edges together with the raw edges of the soaker body, stretching the waistband to fit along the soaker.  Do the same with your leg cuffs.

Once all of the pieces of your soaker are together, center your snaps in the waistband at the edge, center them in the leg cuffs at the edge, and center them in the sides of the soaker.

Do you like the patterns? Feel free to make a small donation.

Side-snapping soaker pattern


Sunday, April 10, 2011

Side snapping soaker!

A lovely lady on the Diaper Sewing Divas board put up a tutorial on how to convert the soakers into snapping ones, and her design is beautiful.  When we get it worked up, I'll post the pattern alterations and a picture tutorial. 

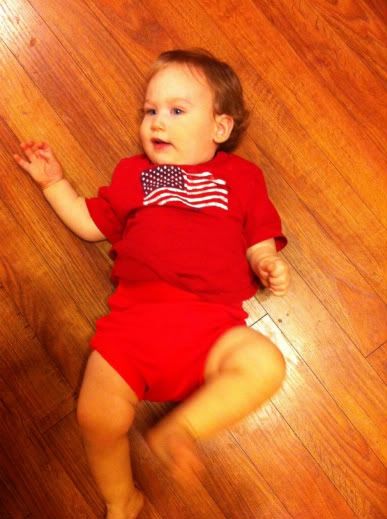
Until then, I am working on alterations for making PUL/fleece covers from the soaker patterns.  It doesn't take a lot of alterations to make one of these.  The one in this picture (the red one) was made with the large pattern for the body and the medium pattern for the waistband and leg cuffs.  It fits my 25 lb one year old (his birthday is Saturday) perfectly.  It is shown next to a white, size medium Stacinator PUL/fleece cover and on my beautiful baby boy.  Hopefully, I'll be able to add a tutorial and patterns for this soon.

Tuesday, September 7, 2010

Just a soaker

This is the last wool soaker that I sewed.  I believe it was a small.  Since the wool blend interlock was so stretchy, I made the waistband smaller so that it would stay on better.  I would have put up some modeling shots, but at the time I made this one, I didn't have anyone small enough to wear it.  I sold it.  I hope the recipient enjoyed it.  It was some nice, thick wool. 
Photobucket

Thursday, July 29, 2010

Swag Bucks

Okay, so I was skeptical about the whole Swag Buck thing. I mean, really, I could get actual money, giftcards, or other stuff without jumping through a bunch of hoops? I didn't think so.

Today, I received $10 in my PayPal account from Swag Bucks. All I did was stuff I was already doing. I got swagbucks by searching the web and by buying stuff online. I also answered a couple of surveys for extra swagbucks. I nearly have enough for another $5 in PayPal. I guess this is my answer to buying fabric now that my local Walmart quit selling it. I'll be buying online with my PayPal!

I signed up 3 months ago. I'm never good at finding the swagcodes, but I still am collecting the swagbucks with my online searches. I also get one swagbuck each day from the daily poll and another one for just checking to see what's listed in the Trusted Surveys. It takes 700 swagbucks for $5 in PayPal, but you can get a $5 Amazon e-giftcard for 450 swagbucks.

Anyway, if you want to sign up, there's a link on the right, or you can click here. That's my referal link. If you refer someone you can earn up to 1000 swagbucks right along with them when they do online searches.

Sunday, April 18, 2010

Our newest addition to the family!

Maxwell Robert


Born on Friday, April 16th at 4:34 p.m.


9 lbs 2 oz, 21 1/4 inches long


Thursday, January 7, 2010

Need elastic in the waistband and legs?

Do you like the look of the waistband and leg cuffs but wish they had more stretch? Thanks to Sew*Chic Mama, you can add elastic to the your soaker following her tutorial. You can follow these instructions to add elastic to the waistband of your longies as well.

Monday, November 2, 2009

Knitted Frog Hat

Here is a frog hat I knitted for my nephew. It's being modeled by my 3 year old daughter.
Photobucket

Sunday, September 27, 2009

Skirtie Pattern!

Here is a pattern for a circle skirt to go over the soaker. Pin it in between the waistband and soaker body before sewing on the waistband. A tight satin stitch around the bottom will create a pretty lettuce edge. Skirtie Pattern Thank you, Staceyroo77 from DiaperSwappers, for providing the skirtie pattern! You can find examples of Stacey's beautiful creations here. http://www.diaperswappers.com/forum/showthread.php?t=651397

Friday, September 18, 2009

Contest to win BumGenius cloth diapers!

Enter to win 6 BumGenius cloth diapers.

Everybody’s raving about the bumGenius 3.0 One-Size Cloth Diapers, so ClothDiaperTips is going to give one lucky commenter SIX free diapers (value $120+)

Click here for more details.

Thursday, September 3, 2009

Scrappy longies

I love how these turned out! He can wear them with anything.

Photobucket
Photobucket

Saturday, August 1, 2009

I've learned to knit!

I love it! It makes such pretty things. I got my knitting needles for Mother's Day, and here's what I've done.

Photobucket

Photobucket

Photobucket

Photobucket

Photobucket

Saturday, October 25, 2008

The Zero Matrix

My colleagues in the math department along with the math club made a parody of the Matrix. It's hilarious! I just thought I would share.

http://www.youtube.com/watch?v=jWCDPpeE7xE

Wednesday, September 24, 2008

Longies pattern

Here are some longies pattern I drafted. You will need to add the seam allowance. The newborn is pretty small. It will fit much better made with wool than with fleece. I was able to do this with the help of a wonderful tutorial made by Stefanie (aliandmimismom) on Diaper Swappers. http://www.diaperswappers.com/forum/showthread.php?t=508956

Please add a seam allowance to these patterns except for the waistbands. I have not tested all of these patterns, so sew at your own risk. :)

Waistbands

NB Longies pattern

Small Longies pattern

Medium Longies pattern

Large Longies pattern

XLarge Longies pattern

Do you like the patterns? Feel free to make a small donation.

The pink ones are fleece NB longies. All others are wool/lycra blend interlock in various custom sizes. The best place to buy wool interlock (IMO) is Nature's Fabrics.

Photobucket
PhotobucketPhotobucket PhotobucketPhotobucket

Wednesday, August 13, 2008

How many soakers can I make?

Here are a few sample layouts to give you an idea of the number of soakers you can get from different amounts of fleece. 3 XL on 2/3 yd of 58" wide fleece. Photobucket 5 larges and a small on a yard of 58" wide fleece. Photobucket 2 larges and a small on 1/2 yd of 58" wide fleece. Photobucket 7 mediums on a yard of 58" wide fleece. Photobucket 4 mediums on 2/3 yd of 58" wide fleece. Photobucket 3 mediums on 1/2 yd of 58" wide fleece. Photobucket

Sunday, July 6, 2008

New baby!

I'm slow with replying to comments these days. I had a baby boy on Mother's Day! He was nearly a month early (not due until June 3rd) and had to spend a couple of weeks in the NICU. He and his big sister (23 months old now) keep me pretty busy.

There is a huge thread at Diaper Swappers that has lots of information in it. http://www.diaperswappers.com/forum/showthread.php?t=227301&highlight=yard

Also, you can find tons of wonderful diaper making information at Diaper Sewing Divas.
http://diaperdivas.proboards57.com/index.cgi

Wednesday, February 27, 2008

Altering the pattern for a longer rise

I make medium long soakers for my daughter. She doesn't need a large, but the medium wasn't quite high enough in the back. Here's how to alter the pattern to get a higher rise. Cut the patter in the size you like except don't stop at the waist that comes with that size. Instead, keep cutting upward along the side seam until you get to the line that goes with the next size up. Here are some pics for making a medium long.

Photobucket
Photobucket

Tuesday, February 19, 2008

Newborn wool soaker

Here is my latest wool soaker. I made it with 97/3 wool/lycra interlock. I dip dyed the soaker body before I sewed it together. I made it for my baby boy who will be here around the end of May, but my husband thinks the colors are too girly. I'll try again. The purplish pink part was supposed to be blue.

Photobucket

Sunday, February 3, 2008

Alternate method of applying the waistband and leg cuffs

Here are some pictures of another method for sewing on the waistband and leg cuffs. This method requires less stretching of the materials.


Leaving the soaker inside out, put the leg cuffs inside the soaker matching up the raw edges.
Photobucket

Here's the leg cuff completely sewn in.
Photobucket

Do the same with the waistband.
Photobucket

Here's the finished soaker.
Photobucket
Photobucket

Thursday, January 17, 2008

Extra layer for the wetzone

Here's my first attempt at an extra layer you can sew into the wetzone. I tried to make sure you would have enough room to sew it into the body layer before sewing the rest of the soaker together and still not catch it in the seams.

Extra layer for the wetzone Pattern
Extra layer for the wetzone XXL and XXXL Pattern

Do you like the patterns? Feel free to make a small donation.

Photobucket

Saturday, October 6, 2007

Instructions for sewing the soaker.

Place all of the soaker pieces on the fold of the fabric, making sure the stretch of the fabric is going from left to right (hip to hip). You also want the leg cuffs and waistband to have the stretch going from left to right (along the longest side). For fleece, the stretch should go in the opposite direction of the bold lines on the pattern. If you are using knit wool, the knit (Vs in the knit) should go in the direction of the bold lines.

On the new pattern for fleece soakers, the arrowed lines should go in the direction of the stretch of the fleece.

Here's a good video tutorial by Sew Cheeky that also includes adding the skirtie.

Photo Sharing and Video Hosting at Photobucket


Cut out all four soaker pieces. If you desire a slimmer/wider waistband or leg cuffs, make the necessary adjustments to the rectangles you cut for those pieces.


Photo Sharing and Video Hosting at Photobucket


Putting right sides together (when there is a right side to the fabric), sew the sides of the soaker body together. Putting right sides together, sew short ends of the waistband and the leg cuffs to form bands. If the material you are using has a tendency to unravel, use a zig zag stitch on the raw edges.


Photo Sharing and Video Hosting at Photobucket


Fold down the waistband and leg cuffs with wrong sides together so that the raw edges of the seam are hidden. Turn the soaker body right side out.


Photo Sharing and Video Hosting at Photobucket


Put the soaker body inside the waistband with all raw edges together. Sew the waistband to the soaker body. I try to center the seam in the waistband in the back of the soaker. Use a zig zag stitch on the raw edges as needed. If you don't like to stretch your waistband so much, you can also turn your soaker inside out and put the waistband on the inside with raw edges together to sew it. I will be adding pictures of this procedure.


Photo Sharing and Video Hosting at Photobucket


Photo Sharing and Video Hosting at Photobucket


Place the leg cuffs on the soaker body in the same manner as the waistband with raw edges together. Sew the leg cuffs to the soaker body. Use a zig zag stitch on the raw edges as needed.


Photo Sharing and Video Hosting at Photobucket


Admire your handywork!


Photo Sharing and Video Hosting at Photobucket


Photo Sharing and Video Hosting at Photobucket


Inside of the soaker


Photo Sharing and Video Hosting at Photobucket
Photobucket